
Vortex user guide
Vortex gives you more control over your shape rigs: controls only on the points you pick, bezier handles as layers or masks, a Pivot for many points, and followers that slide along the path or follow a whole group. Split the layer or merge it with others, and the rig keeps working.
Download PDFInstallation
The easiest way to install and license is by using the aescripts + aeplugins manager app. To install a trial you can select ‘Add Trial’ from the ‘Account’ menu.
Get the manager app at aescripts.com/learn/post/aescripts-aeplugins-manager-app
Alternatively you can use the ZXP/UXP Installer: drag the Vortex .zxp file onto its window.
Opening Vortex
Restart After Effects, then go to Window › Extensions › Vortex.
The panel
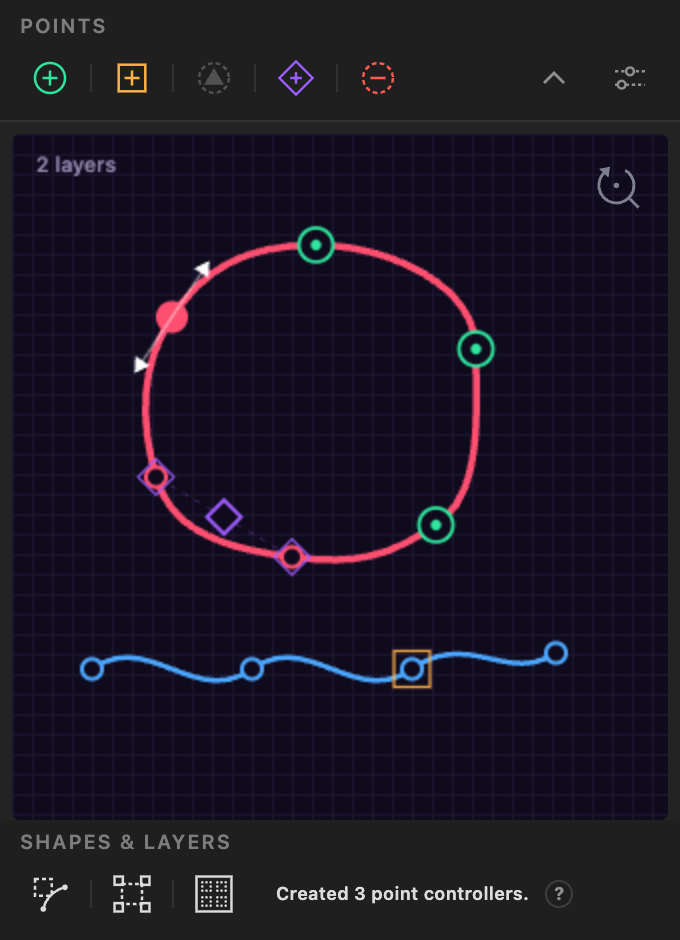 0102030405
- PointsCreate, Follow, Handles, Pivot and Delete. Compact mode and Preferences on the right.
- PreviewWhere you pick points. Points with controls show them.
- InspectLoads the shapes selected in After Effects. By default it also follows your selection when you return to the panel.
- Shapes & layersConvert to Bezier, Extract and Merge.
- Status line and ?What the last action did.
Hover a button to see what it does and which keys change it. Right-click Inspect, Create, Follow, Handles, Pivot or Delete for the same options as a menu. Actions use your last point selection, in the preview or in the viewer.
Points
Every control Vortex makes is a small shape layer with its own shape and color. By default they are guide layers, so they don't render, and they are parented to the shape layer.
Layers are named by what they are, then their shape layer: Point 4 · Logo Pivot · Logo Follower 1 · Logo. Rename them or move them in the timeline as you like; the rig keeps working.
| Create | A point controller, an emerald circle that moves its point, on each selected point. With no points selected, on every point of the path (above 30 points it asks first). With Handles on, each point also gets its two handles. Each point controller has a Size slider in Effect Controls, for how big it's drawn, and a Mirror Handles checkbox: when it's on, the In handle mirrors the Out handle in direction and length. Shiftadds a Pivot over the new point controllers |
| Follow | A follower, an amber square, on each selected point: a layer that moves with the point. Every follower comes with an Offset slider that slides it along the path, in % of its length; on a closed path, 0 to 100 is one lap and 300 is three. Follow Rotation rotates it to follow the path's direction. Followers work on Rectangles, Ellipses and Stars as they are, with no need to convert them first. An Average follower is one layer at the center of several points. It moves with the group, and with Follow Rotation and Follow Scale it also turns and scales with it. Shiftone Average follower for the selected points |
| Handles | A switch. When it's on, Create also makes handles, blue triangles that control the bezier curve, as masks inside the point controller or as separate layers. Handle layers sit right above their point controller, so clicking a handle in the viewer picks the handle. Shiftadds the missing handles to the selected pointsAltswitches their handles between masks and layers |
| Pivot | A Pivot, a violet diamond, is a parent for two or more points or layers, at their center: move, rotate or scale it and they all follow. Controls become its children; points without controls follow it directly. Points from several layers can share one Pivot. Its Handle Length (%) and Handle Angle (°) scale and rotate the handles of all its points together. Above 100%, corner points without handles grow curved handles. Its Pivot Offset, in Effect Controls, moves the center the Pivot rotates and scales around, without moving anything else. You can animate it. Shiftrecenters the selected Pivot (a still Pivot Offset goes back to 0) |
| Delete | Removes the selected controls and keeps the shape where they left it, animation included. With nothing selected, it asks before removing every control of the inspected shapes. Select points of a Pivot in the preview and Delete takes just those points out of it; the Pivot and the other points stay. Deleting a Pivot itself removes only the Pivot: its controls stay, with Keep Shape or Restore Path, even when the Pivot is animated. Altrestores the original path insteadShiftevery control of the inspected paths |
Shapes & layers
| Convert | Turns Rectangles, Ellipses and Stars into bezier paths you can rig. Followers don't need it. |
| Extract | Moves shapes to layers of their own: the ones selected in the preview, else the groups selected in the timeline, else every group of the layer. Controls keep working. The original stays hidden as a backup. |
| Merge | Combines two or more shape layers selected in the timeline into one. Controls keep working, and the originals stay hidden in the comp. |
Preview
| Select | Click a point or drag a box. Shift adds or removes. Click empty space to deselect. |
| Zoom and pan | Mouse wheel to zoom. Hold Space and drag, or drag with the middle button, to pan. Double-click empty space to reset. |
| Several layers | Inspect several shape layers together: they show where they are in the comp, and one drag picks points from all of them. |
| Find a path | Hover a point or stroke to see its layer and path. Double-click a stroke to select that path in After Effects. |
| Compact | Hides the preview and leaves only the buttons, for a small panel next to the timeline. Every action then uses the After Effects selection, so you pick points in the viewer. |
Preferences
The sliders icon at the right of the Points band. Reset to defaults brings everything back. Defaults are in white.
| New handles | Masks · Layers |
| Parent controllers to the shape layer | On |
| Controllers are guide layers (not rendered) | On |
| Select the new controllers after Create | On |
| Ask before creating more than | 30 |
| Colors · size · stroke of new controllers | Palette · 35 px · 7 pt |
| Line from layer handles to their point | On |
| Dark outline (for light artwork) | Off |
| A Delete click | Keeps the shape · Restores |
| Merge keeps the originals hidden | On |
| Center the anchor after Merge / Extract | On |
| Returning to the panel | Off · Auto Inspect |
| Pivot lines in the preview | Always · Selected |
Good to know
Hand off the live rig
Rigs are standard expressions and effects saved in the project, so someone without Vortex can open it, move the controls and render. Or bake it with Delete.
Other tools' rigs
Vortex doesn't rewrite other tools' expressions and won't rig a path that already has an expression. Extract and Merge undo themselves if another layer's expression would change.
Merge with scaled layers
When every layer has the same uniform scale, not animated, the controls move to the merged layer. Otherwise they stay on the hidden originals and keep working.
Light artwork
Turn on Dark outline in Preferences so new controls stay visible. Existing controls take their Fill color from After Effects.
Support
Questions or bugs: the support tab on the Vortex page at aescripts.com. A short screen recording and the text of the status line help a lot.
© 2026 Transversal · transversal.tools